AION 2 Fire Temple guide: bosses and flame walls
Prepare for normal Conquest, read Kromede's walls and bow attacks, and separate reward choices from unavailable Hard-mode data.
Mid game · fire-temple, conquest, kromede, bosses, expedition
Last updated:
By Hizzle Guides · Published 2026-11-04 · Facts checked 2026-11-04 · Game version checked: Global Windows PC; November 4 patch and Hard-menu hotfix reviewed; no in-game testing

For normal Fire Temple Conquest, prepare for the two main side bosses, then read Kromede's moving flame-wall gaps, bow direction and clone telegraphs. Keep enough stamina to handle the attacks after each wall phase.
Status: Single source for the complete clear method. Hizzle compared guide steps, their creator credits, dated player reports and October 28 community client records. Several guides reuse RedCloud, kennai or other regional material, so extra websites do not establish two independent complete current-global methods. Latest November 4 notes were reviewed. Hizzle has not played or cleared this dungeon.
Choose normal Conquest before copying a route
The checked global-oriented entry records distinguish:
- Exploration: character level 35, item level 500, listed reward-cube cost 30 Odyle Energy.
- Normal Conquest: character level 45, item level 2,100, listed reward-cube cost 40 Odyle Energy.
- Both list 1–5 players. That capacity is not evidence that a fresh character can solo the Conquest fight.
The October 28 extraction contains a Hard row with item level 2,800 but character level 99. NC's November 4 hotfix now explicitly says the Hard option shown for Fire Temple and Ferocious Horn Den was unintended. Exit, update through Steam or PURPLE and restart as the notice instructs if that old option is displayed. This walkthrough covers normal Conquest; a historical data row is not an available Hard route.
Use the dungeon's live entry and reward panels before committing resources. A party's requested Combat Power is a group preference, distinct from the entry gate. This guide does not prescribe an unsupported minimum damage number.
Agree the run before the first pull
Hizzle's preparation checklist:
- State that this is a learning run and agree whether the party wants both side bosses.
- Keep movement, recovery and defensive skills accessible. A damage macro should not hide the decision to move.
- Check which potion or skill actually removes your current burn. Do not assume every bottle or every heal cleanses it.
- Read the current cube cost, count and Guaranteed Reward preview. Use AION 2 Odyle Energy: should you open the cube? if you are deciding whether to claim.
- Follow one agreed route together. A shortcut is optional preparation, not an entrance exam.
An unfamiliar party can learn more from a safe route and a specific wipe review than from repeatedly losing someone to a jump. Nobody earns extra stamina by telling the owl it was an easy jump.
The route and the fourth named creature
The data lists Silver Blade Rotan, Red Spark Ignus, Black Smoke Murute and Kromede's Desire. That is a creature list, not four mandatory boss rooms. Creator-derived routes treat Rotan as a roaming elite and focus on the two side bosses plus Kromede.
The route references describe respawn binding points and optional coolant consoles. Activate the binding points you pass. Agree whether the group will use the consoles instead of sending an unprepared player away alone. Before opening the final room, wait for the party: the described door transition brings the group into the fight.
The side-boss order varies between route descriptions. Hizzle's recommendation: agree on both rooms for the first learning clear rather than following an unexplained speed skip. Exact skip eligibility, minimum kills and every reward consequence still need an independent current-global check.
Black Smoke Murute: read the floor after the slam
Older guides may call this boss Marute. The checked English client reference uses Murute.
The compared route describes ground circles, an expanding area attack, a forward dash and a thrown rock. Keep clear of the front and move out of marked ground areas. A small patch of floor fire is another hazard, not a safe place to wait for the next attack.
UNSURE: one fixed number of expanding pulses. The guide family reports three or four. Continue watching the telegraph until the sequence ends instead of returning to melee after counting a preferred number.
The creator reference recommends using a Stagger break against a large charged attack. Treat that as a Single source timing recommendation. Agree who contributes Stagger rather than spending everything before the group knows which attack it wants to interrupt.
Red Spark Ignus: place fire away from the group
The client-derived Flame Bomb record describes an explosion and pool after a 5-second delay. Hizzle uses this as a reference, not a stopwatch guarantee: react to your visible mark promptly.
The compared method places marked fire away from teammates, then moves clear. Do not run your pool through the party while trying to preserve one more attack.
When Ignus jumps to the center for the room-wide fire attack, the creator-derived method identifies the space close to him as safe. Keep this Single source positioning step separate from his other floor attacks; moving close is not a universal answer to every orange area. The described follow-up rushes target players in turn, so leave room between teammates.
UNSURE: exact HP thresholds for every transition. Use the boss action and arena telegraph to identify the mechanic.
Kromede: distinguish the two bow tells
The compared normal-Conquest method reads her weapon:
- Sword and frontal attacks: avoid standing in front when your role does not require it.
- Bow aimed down: move out of the line toward you. Close players should make space because the lines can overlap.
- Bow aimed up: respond to the ground markers and keep moving clear of the following attack.
The reference describes a later double downward shot. After avoiding the first line, keep watching before returning to your original position. A farthest-player leap is also described, so ranged distance should be deliberate rather than an accidental race away from the group.
These are compared guide cues, not Hizzle observations from gameplay. A screenshot of a safe spot during one cast does not establish a permanent safe location.
Flame walls: solve the next gap, then the next attack
When the wall phase begins, look across the approaching row for its opening and move toward that opening early. Re-read the next row instead of assuming its gap repeats. Preserve stamina for what follows.
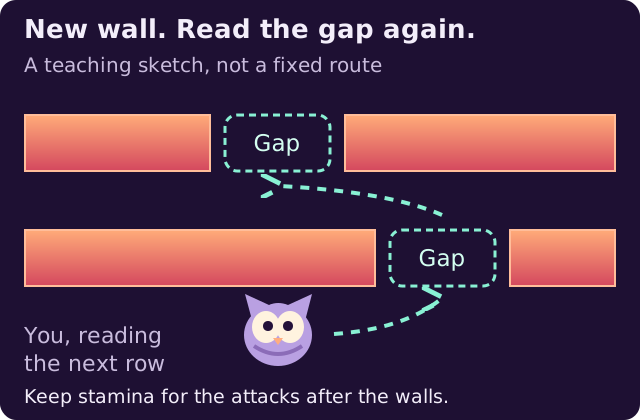
Original Hizzle schematic. Gap positions, path and owl are illustrative. This is not a map, a cast timer or a fixed left-right sequence.
Hizzle's learning sequence:
- Stop treating the boss as the only thing worth looking at. Find the opening in the incoming wall.
- Move into a useful lane while you still have room to adjust.
- Read each new row. Avoid using every movement charge simply because a button is available.
- After the wall phase, immediately resume reading the arrow markers and the boss's movement.
- If hit, identify the debuff and use the recovery or cleanse that your setup actually provides.
Guide thresholds conflict: some place walls near 75% and 25%, while others place them around 70% and 35–40%. The data reference does not establish those HP triggers. UNSURE: exact current-global thresholds and a universal wave count. Do not wait for one quoted percentage before looking up.
The later wall phase is described with additional fire hazards. Read the floor as well as the approaching gaps. This page does not prescribe a latency-specific roll timing or guarantee that every class can ignore a wall with a defensive skill.
Clones and the damage check
The compared clone method says to spread, read the line followed by a wider frontal attack, and reposition away from the attack direction. Hizzle's recommendation: leave enough room for each player to read their own pattern. Standing on a teammate can obscure which attack is yours.
The community client reference lists Frenzy after 5 minutes in Conquest. That is not the four-minute timer announced for certain other Hard Expeditions. If the group reaches Frenzy, review deaths, missed attack windows and mechanics before blaming one gear number.
UNSURE: exact optimal role assignments, complete clone timing and every current damage interaction. No guaranteed clear time is claimed.
Read the normal reward menu, not the Hard list
The checked normal-Conquest Guaranteed Reward reference gives a pick after 28 opened cubes, offering the Fire Temple gear-change voucher or three Enraged Kromede accessories. A class weapon appearing in a separate Hard data row is not proof that normal's menu offers it.
Count opened cubes separately from runs. Recheck the current preview before choosing. This page does not promise a weapon after a fixed number of runs, copy a calculated drop chance or present every possible item as a guaranteed reward.
The November 4 Exploration reward increase names Draupnir, Vakron Sky Island and Ferocious Horn Den. It is not a blanket announcement that Fire Temple Exploration now pays the same rewards as Conquest. See AION 2 gear upgrades: belt, amulet and spending before investing in an interim drop.
For the checked recipes and separate cube counters, read AION 2 Fire Temple rewards: vouchers and weapon swaps. The emote goal now has a labeled method in AION 2 Sauna: get Kromede Will Remember That. Full journal coverage, skip consequences and independent boss methods remain unfinished; see AION 2 achievements: Steam support and in-game goals.
Related
AION 2 dungeons: prepare for your first group · AION 2 Fire Temple rewards: vouchers and weapon swaps · AION 2 Sauna: get Kromede Will Remember That · AION 2 settings for clearer combat · AION 2 level 45: a gear progression roadmap · AION 2 Odyle Energy: should you open the cube? · AION 2 gear upgrades: belt, amulet and spending · AION 2 Cleric PvE build: healing and Condemnation · AION 2 Chanter PvE build: Dark Crush and party buffs · AION 2 achievements: Steam support and in-game goals · AION 2 global patch notes: guide changes and limits
Sources we checked
- Community client entry and reward recordsChecked 2026-11-04
- Community client mechanics and dated player reportsChecked 2026-11-04
- Creator-derived Conquest route and boss comparisonChecked 2026-11-04
- Global boss cues and source provenanceChecked 2026-11-04
- Dated Conquest comparison and shared method creditsChecked 2026-11-04
- Official October 21 Hard-mode additionsChecked 2026-11-04
- Official October 28 Hard-mode additionsChecked 2026-11-04
- Official November 4 Hard-menu hotfixChecked 2026-11-04
- Official November 4 patch scopeChecked 2026-11-04
UNSURE marks what this guide hasn't established. Hizzle Guides research from public sources; we don't claim in-game testing unless a page says so.