AION 2 Krao Cave guide: Normal bosses and Berk
Prepare for Normal Conquest, read Berk's rock-cover and stagger cues, and track the six clear milestones without importing Hard-mode rules.
Mid game · dungeon, krao, berk, normal, conquest, achievement, stagger
Last updated:
By Hizzle Guides · Published 2026-11-04 · Facts checked 2026-11-04 · Game version checked: Global Windows PC; November 4 patch and Hard-menu hotfix reviewed; no in-game testing

For a first Normal Conquest attempt, bring a learning party, clear both side bosses and arrive at Berk together. His important checks ask for different responses: take cover from Wave of Fury; contribute stagger during Extinction for Eternity. More damage does not replace either response.
Evidence: this is a researched Normal learning route. The full route remains Single source where it relies on Kinah Ledger's walkthrough. Conflicting details stay UNSURE below. Client warnings corroborate specific actions, not every step or a complete independent run. No in-game testing.
Choose the right mode
| Mode | Reported entry gate | Scope here |
|---|---|---|
| Exploration | Level 20, item level 200 | Easier practice; different journal credit |
| Conquest Normal | Level 45, item level 700 | This walkthrough and its six clear milestones |
| Conquest Hard | Level 45, item level 2,600 | Separate encounter; no full Hard solution here |
Community global references agree on these gates. The official October 21 update introduced Hard Krao with a four-minute Frenzy timer and three revives per player at the final boss. Do not bring a Korean Hard pillar puzzle into a Normal learning group.
The November 4 notes and hotfix were reviewed. Neither names a Krao encounter-mechanic change. The hotfix's removed Hard-menu choices concern Fire Temple and Ferocious Horn Den. That absence does not prove every live Krao behavior is unchanged.
Before entering
- Say that this is a Normal learning run and agree to clear both side bosses.
- Put your stagger tools where you can reach them. Use your AION 2 classes: choose your first character page's linked build for your class, rather than assuming every damaging skill contributes equally.
- Set a camera distance that lets you see floor warnings and available cover.
- Decide who keeps the boss facing away from the party and who can restore the group after a mistake.
- Separate the goal of clearing from spending on its cube. Read AION 2 Odyle Energy: should you open the cube? before committing your reward resources.
Reach Berk without scattering the party
The two side bosses are Enhanced Harcon and Neglected Gadioton. Kinah Ledger permits either branch order. Clear both for this learning route; it reports that skipping them reduces the final reward composition.
For both fights, leave marked ground attacks and avoid collecting unrelated enemies. UNSURE: exact Harcon sequence. Walkthroughs describe repeated crossing lasers, while the October 28 client-derived Aion2.gg record emphasizes slams and summoned test subjects. Treat the floor you can see as the cue; this page does not promise a laser at a fixed HP percentage.
Gadioton's client-derived record includes a pull followed by knockdown, plus repeated hits down a lane. Keep a movement or control-recovery option available. Once pulled in, move out of the dangerous center; leave a marked lane sideways rather than retreating along it. Exact thresholds and timing remain UNSURE. Read your equipped skill's effect instead of relying on a universal keyboard shortcut or promised immunity duration.
Defeat the Krao Seal Guardian to open the inner passage. Bind the available Kibelisk checkpoint. Wait for everyone to enter before approaching Berk: the walkthrough warns that an early pull can lock teammates outside.
Berk: learn these three responses
1. Give his front room. Kinah Ledger describes an orange charge strip and frontal combinations. Leave the marked lane and recheck his facing after he moves. When red dust signals a spin, stop chasing melee uptime and get out of its path. If he follows you, lead the danger away from teammates. A survivable gap in your rotation beats a party buried under your spin.
2. Take real cover from Wave of Fury. The client-derived warning tells players to shelter behind a rock. Put the rock between your character and the boss's wave origin, then wait for the hit to resolve. Move early enough to settle into cover. A rock beside you does not block a wave coming from the other direction.
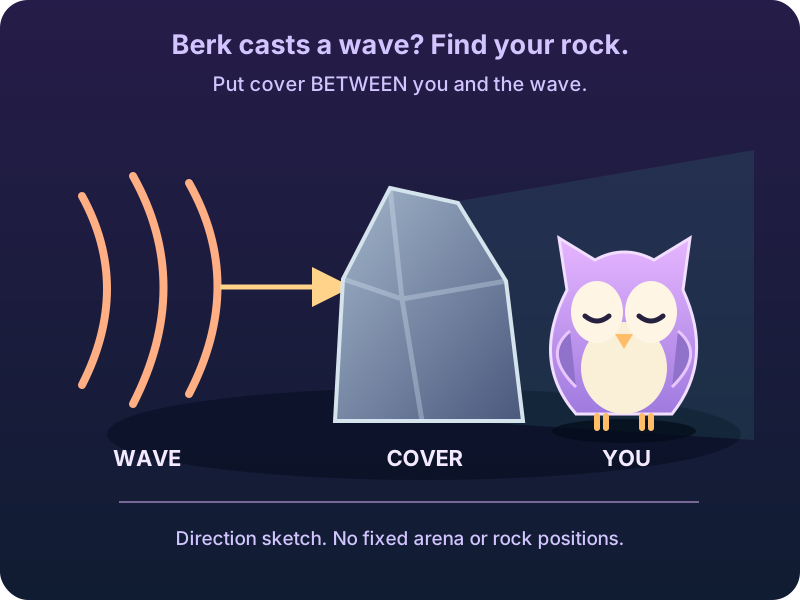
UNSURE: sources disagree on rock counts, exact HP triggers and regional behavior. Look for the cast and the actual cover available. This drawing gives no fixed rock position, safe clock direction or Hard-mode decoy test.
3. Answer the stagger cast together. Extinction for Eternity is the named stagger check in the client-derived guide. Community Normal routes place it around half health. Preserve useful stagger skills as that point approaches, then react to the visible bar and cast. Everyone who can contribute should do so while avoiding ground attacks. Do not spend the whole window waiting for a single teammate.
Which timer matters?
Aion2Maps and the mode table in the client references list Berk's Normal timer at five minutes. This is separate from the dungeon's reported 60-minute run limit. Hard's four-minute timer is a different mode.
UNSURE: exact Normal timeout result. One walkthrough describes a wipe; client-derived references describe a Frenzy buff increasing speed and damage. Aion2.gg's prose also says four minutes where its Normal table says five. Plan to finish before the Normal timer expires. No exact damage multiplier or promise to heal through timeout is established here.
Normal clear milestones and the Tour Guide title
Single source grouped clear method: finish Krao Cave on Conquest Normal, inspect the journal afterward and repeat to the next cumulative milestone. The route above is the preparation method. Exploration and Hard have separate clear groups. Whether a clear requires claiming a cube for credit remains UNSURE; do not spend Odyle solely on that assumption.
| Journal tier | Total Normal clears |
|---|---|
| I | 1 |
| II | 3 |
| III | 5 |
| IV | 10 |
| V | 15 |
| VI | 20 |
Both community journal listings give this count sequence. Aion2Data's per-tier listing puts Krao Cave Tour Guide at tier I, whereas MetaBot combines all tier rewards in one row. The award placement is Single source; it is not evidence of an independent gameplay unlock test. Check your journal and title list after the first credited clear.
Roadmap: begin with an ordinary party clear, then repeat as gear and familiarity improve. Online required; a solo restriction is not stated for this group. Difficulty and time to 20 clears are UNSURE and depend on gear, party and available runs. A missable deadline, paid-DLC requirement and faction-specific credit behavior are UNSURE. Do not assume a season reset from these listings.
The same journal lists speedruns, no-death runs, solo runs, side-boss kills, Snipers First and Hard clears. Those are separate objectives, not extra conditions silently added to a Normal clear. Their complete methods remain pending; none is labeled Verified here.
Related
Sources we checked
- Official November 4 full patch notesChecked 2026-11-04
- Official November 4 Hard-menu hotfixChecked 2026-11-04
- Official October 21 Hard-mode introductionChecked 2026-11-04
- Kinah Ledger normal route and Berk cuesChecked 2026-11-04
- Aion2Maps mode-specific timers and source distinctionsChecked 2026-11-04
- Aion2Data October 28 client warnings and skill recordsChecked 2026-11-04
- Aion2Data per-tier dungeon journalChecked 2026-11-04
- MetaBot Krao Cave grouped journalChecked 2026-11-04
- Daeva Guides normal route and conflicting timer accountChecked 2026-11-04
- Aion2.gg client-derived bosses and mode tablesChecked 2026-11-04
UNSURE marks what this guide hasn't established. Hizzle Guides research from public sources; we don't claim in-game testing unless a page says so.